JupyterLab에서 유용한 extensions
JupyterLab 1.0 버전 이후로 유용한 extension을 소개한다.
awesome jupyter (jupyter extensions 소개)
extension 설치방법
jupyterlab extension을 설치하기 위해서는 nodejs가 필수로 설치되어 있어야 한다.
참고 : How to Install Node.js and npm on Ubuntu 20.04 & 18.04
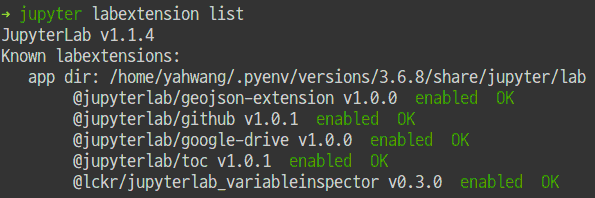
CLI를 통한 설치
jupyter labextension install [ extension 명]
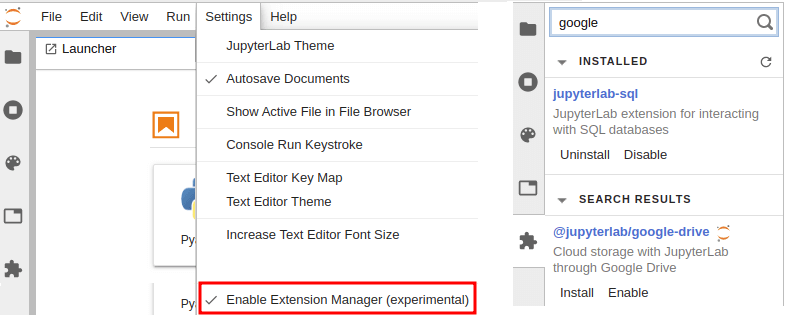
JupyterLab에서 설치
Settings 설정을 해주면, 원하는 extension을 검색해서 간단히 설치할 수 있다.
0. 일반적인 용도의 extension
| extension 명 | 설 명 |
|---|---|
| jupyter-widgets/jupyterlab-manager | ipywidget 실행을 위한 extension |
| jupyterlab/jupyterlab-toc | table of contents 기능을 위한 extension |
| krassowski/jupyterlab-go-to-definition | go to definition 기능을 위한 extension |
| dnanhkhoa/nb_black | black formatter 자동적용을 위한 extension |
| kiteco/jupyterlab-kite | Kite Autocomplete Extension for JupyterLab |
| hadim/jupyter-archive | 작업중인 폴더 다운로드(zip) 기능을 위한 extension |
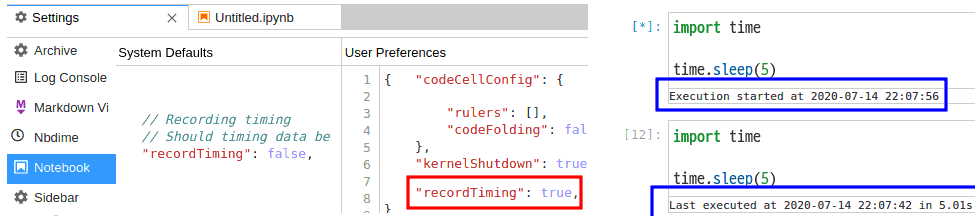
0-1. jupyterlab-execute-time
github.com/deshaw/jupyterlab-execute-time
1.0.0 기준
셀을 실행한 시간과 경과한 시간을 확인할 수 있다. 설치 후 settings에서 recordTiming을 true로 설정해야 한다.
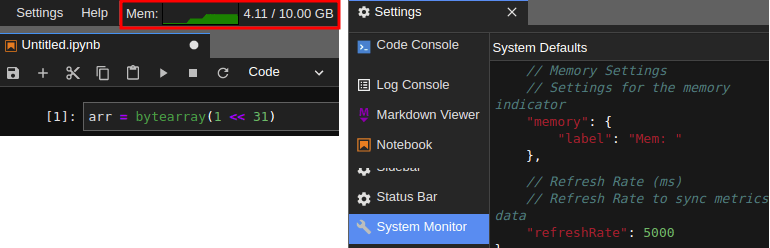
1. jupyterlab-system-monitor
github.com/jtpio/jupyterlab-system-monitor
0.4.1 기준
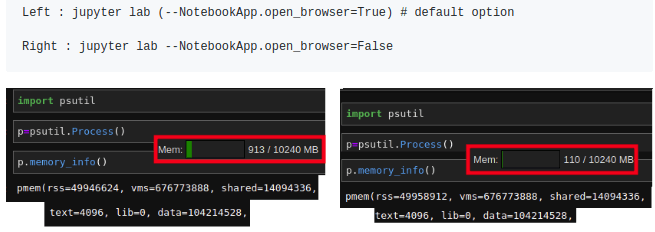
jupyterlab에서 사용하는 메모리 사용량을 확인할 수 있다. 그냥 설치만 하면 단순 사용량만 숫자로 확인 가능하다.
그래프를 보려면 메모리 사이즈 제한을 설정해야 한다. 현재, 실제로 작동하지는 않는다. 그냥 임의의 설정값일 뿐이다.
jupyter_notebook_config.py에 아래 부분을 추가하면 된다.
( config를 그동안 사용하지 않았다면 jupyter lab –generate-config로 먼저 생성한다. )
기본값으로 5초(5000ms)마다 한 번씩 업데이트 되는데 Settings에서 값을 변경할 수 있다.
#-----------------------------------------------------------
# NotebookApp(JupyterApp) configuration
#----------------------------------------------------------

c.NotebookApp.ResourceUseDisplay.mem_limit= (Size Of GB) *1024*1024*1024
참고 : open_browser=True (default option) 를 사용할 경우, 브라우저 실행 메모리가 포함될 수 있다.
2. jupyterlab-googledrive
github.com/jupyterlab/jupyterlab-google-drive
1.0 기준
구글 드라이브에 파일 업로드 및 수정이 가능하도록 해준다. 노트북 파일을 클라우드에서 관리하는 용도로 유용하다.
아래 Post에서 설치 후 연동하는 방법을 확인할 수 있다.
Post - JupyterLab과 GoogleDrive 연동하기
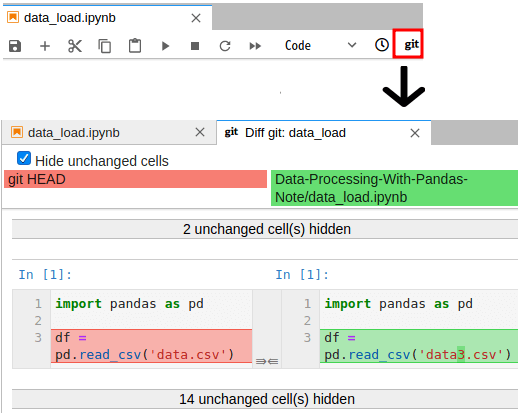
3. nbdime - Diff and Merge tool
Notebook 파일로 Diff and Merge 기능을 제공해준다.
2.0.0 기준
pip install nbdime
jupyter serverextension enable --py nbdime
jupyter labextension install nbdime-jupyterlab
- nbdiff 명령어로 수정한 내용을 확인 가능

- git repo를 사용하면 git의 정보와 현재 저장한 노트북을 비교 가능
참고 : Working with nbdime - in JupyterLab Quick Start Guide
4. jupyterlab-github
github.com/jupyterlab/jupyterlab-github
1.0 기준
github에 올린 노트북 파일을 참고하는 용도로 적합하다. github에 업로드 된 파일을 읽을 수 있다. 단, 수정하거나 업로드는 불가하다.
로컬 노트북으로 셀을 복사하고 붙여넣기는 가능하기 때문에 나름 유용하다.
USER 명/repo 명으로 검색 가능하다.

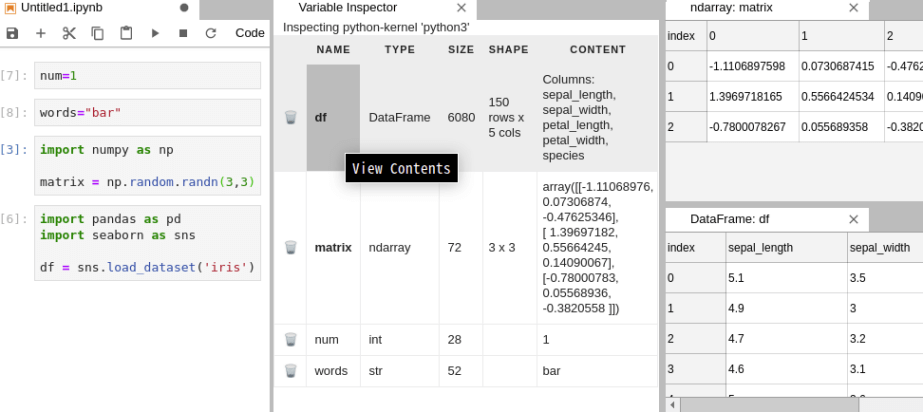
5. lckr/jupyterlab_variableinspector
github.com/lckr/jupyterlab-variableInspector
0.3 기준
jupyter labextension install @lckr/jupyterlab_variableinspector
RStudio처럼 inspector 기능을 구현하려고 하는 extension이다. 휴지통 아이콘으로 변수 삭제를 할 수도 있다.
Name을 클릭하면 array나 dataframe은 value를 테이블 형태로 확인할 수도 있다.
사용방법 : 노트북 파일 빈 공간에서 우클릭 후 Open Variable Inspector를 실행하면 새로 창이 나타난다.
6. pbugnion/jupyterlab-sql
github.com/pbugnion/jupyterlab-sql
0.3.1 기준

설치방법
pip install jupyterlab_sql
jupyter serverextension enable jupyterlab_sql --py --sys-prefix
jupyter lab build

# PostgreSQL 연결을 위한 psycopg2 설치
pip install psycopg2-binary

# MySQL 연결을 위한 pymysql 설치
pip install PyMySQL
pip install cryptography
설치 후 재실행하면 SQL 아이콘을 선택할 수 있고 연결할 DB 정보를 입력한다.
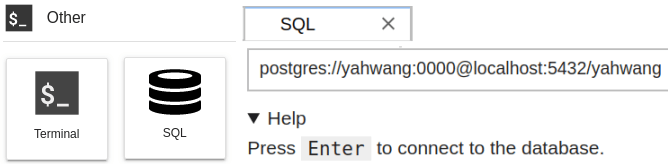
PostgreSQL - postgres://user:password@ip:port/database
MySQL - mysql+pymysql://user:password@ip:port/database
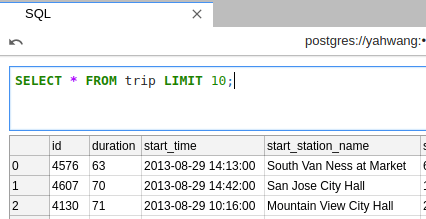
연결하면 DB의 테이블이 보이고 더블클릭하면 1000개까지의 row를 확인할 수있다.
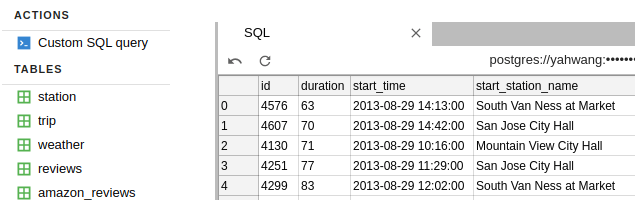
Custom SQL query를 클릭하여 쿼리문을 입력하면(Ctrl+Enter) 결과를 확인할 수 있다.
데이터 복사 등의 추가기능은 현재 없다.
DB의 데이터를 간단히 확인할 수 있는 정도인 것 같다. 노트북 파일에서 활용되는 ipython-sql이 아직은 더 유용해보인다.
References :